Lightroom processing for newbies
You've taken some photos, now what?
Adobe Lightroom is a lot cheaper and less complicated than Photoshop and will give you great results. I put off changing from Camera RAW to Lightroom for years, I am so glad I changed. I still find Photoshop better for cloning and removing unwanted items, but the majority of work can be done in Lightroom.
A great learning tool are You Tube clips. Just type in what you want to know e.g. Lightroom catalog. You will learn a lot.
The Catalog
The hardest thing to come to terms with is the Catalog - it is where all the information regarding your changes are held. The Catalog files are located under Pictures/Lightroom and will start with the words: Lightroom 5 Catalog unless you have given it a unique name.
The first task is to import your pictures. When you open Lightroom, click the Library tab. Then click the Import button at the bottom left hand side of the screen or choose file/import photos or videos.
Then you need to work through the top bar:
My normal workflow is something like this:
My normal Lightroom Developing process:
Bringing back a sky
If any of this doesn't make sense, please let me know so that I can change it.
Adobe Lightroom is a lot cheaper and less complicated than Photoshop and will give you great results. I put off changing from Camera RAW to Lightroom for years, I am so glad I changed. I still find Photoshop better for cloning and removing unwanted items, but the majority of work can be done in Lightroom.
A great learning tool are You Tube clips. Just type in what you want to know e.g. Lightroom catalog. You will learn a lot.
The Catalog
The hardest thing to come to terms with is the Catalog - it is where all the information regarding your changes are held. The Catalog files are located under Pictures/Lightroom and will start with the words: Lightroom 5 Catalog unless you have given it a unique name.
The first task is to import your pictures. When you open Lightroom, click the Library tab. Then click the Import button at the bottom left hand side of the screen or choose file/import photos or videos.
 |
| From |
- Start at the far left From- under Source - drill down and find the folder where the files are - they can be on the hard drive or an external drive - USB, CF or SD card
- In the middle is the How, choose 'move' or 'copy as DNG' to put the files on your C drive in the right place
 |
| How |
- Far right is the To. Click on the arrows and choose a folder, you can create a new one on the fly, otherwise they will all be put under Pictures and this will become a unmanageable mess.
 |
| To |
- In the bottom right hand corner click the Import button
- On the top toolbar, click Library, then click on the first photo you want to process
- Press D or Develop on the top toolbar
- Work your way through the tabs, for ideas see my development process below
- If you work on multiple computers, you can export your catalog to an external drive - File/Export as Catalog. Give it a name and choose a location. If you want do this, I would recommend creating separate Catalog's as it exports all the photos related to the catalog.
- If you move these files in finder, Lightroom won't be able to access them. You will need to go into the Library, right click on the folder and find where you moved the folder to. If the folder is there but you can't see the photos, right click and choose synchronise.
My normal workflow is something like this:
- Download all the RAW photos onto the laptop. RAW allows you to get back data otherwise lost in a jpeg file. Jpegs have already been "processed" by your camera. RAW allows you to create your own personal interpretation. New camera phones are now giving you the option to take pictures in RAW too.
- I rate them in Adobe Bridge - 1 for delete 3 for keep, then filter all the 1's and delete them from disk. Don't keep them or you will end up with millions of photos you never go back to. Be ruthless! If you don't have Bridge then just import them straight into Lightroom.
- Depending on how many there are, I will either convert them to DNG with Adobe's DNG program (free) if I have a lot or import them into Lightroom as DNG's if I don't have many as they take longer this way.
- Process each photo (see Developing process below), saving and changing the rating to 5* when they are finished. If a photo needs extra editing in Photoshop, I will make the original file a 2* and the Tif file it creates a 5*. Any photos that I decide are not worth keeping are given a 1*. I then set the filter to show all the 1*'s and press x for reject. Then delete all the rejected ones from disk. (see below)
- Add metadata - if I remember!
- Because there are two of us, I colour code all mine to blue and green to the others to make it easier to allocate the correct signature when making web files
- Filter all the 5*'s and select them all, rename the photos to reflect the collection they are part of.
- I have three saved export presets. One for iPad size files, one for the Web - both of these are saved as sRGB with a size of 1024px limited to 150kb; the web ones include a signature. The last one is for full size Jpegs.
My normal Lightroom Developing process:
- From the library, press D to Develop (to work on the picture)
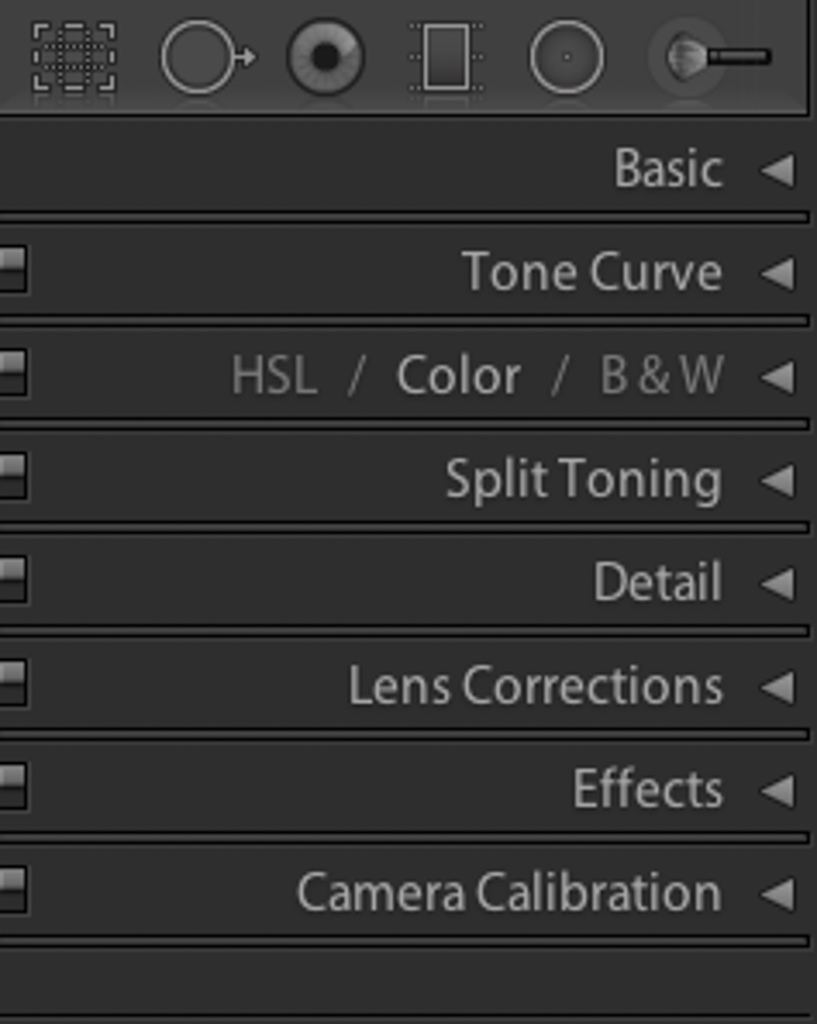
- If it needs cropping, do the Lens Correction first (see below). Then crop it. It is the broken lined square above the basic tab.
- Using the Basic tab, check the white balance with the eyedropper, choose one of the presets (cloudy) or just move the temperature. Depending on the picture, decrease the highlights, increase the shadows, while holding down the alt key, increase the whites (slide it right) until some colour shows through the black. Do the same with the blacks (but slide left).
- If the sky is too blue, go to HSL and increase the vibrance of the blues or maybe decrease the saturation or see "bringing back a sky" below.
- Go to Lens corrections and on the basic tab, click enable profile correction and remove chromatic aberration. If the picture is wonky, click "auto" to straighten and transform. If this doesn't work, try the manual tab.
- The Detail tab is where you sharpen. Depending on the amount of cropping you have done, slide up to 90%. Move the Luminance noise reduction to about 10%, then while holding down the alt key, move the masking slider to the right until you see a fair amount of contrast between the whites and blacks.
 |
| the original photo was taken to preserve the highlights |
- Save (Cmd S) and press 5 to give it a 5* rating, reminding you that you have completed it.
- Go back to the workflow instructions above to add metadata, rename, export.
Bringing back a sky
- Process the photo as normal (see Lightroom developing process above)
- When using a graduated filter (4th one along above the Basic tab, it looks like a rectangle) to reduce the exposure on the sky, you probably will darken other things such as mountains.
- Drag the graduated filter just down from the top to the bottom of the sky
- Increase the shadows while still editing the graduated filter to bring some light back. Add contrast, saturation, reduce highlights etc as needed.
If any of this doesn't make sense, please let me know so that I can change it.


Comments
Post a Comment